

Today I’m rebooting an oldie—we’re going to run a short script to show how Python is a friggin’ delight in Blender. I have with me a boring old kitchen that I want to add a bunch of little lights to.
Let’s start up by opening up the Python Console. Go to your Editor Type selector, and hit it.

What’s the Python Console? It’s a magical place. This is where you can type shit in to ask Blender to do things.
But Blender’s a real stickler for details. You have to format your Python very specifically or if will just throw errors at you. And laugh.
So, how do you get Blender functions to work in Python?
You grab the syntax from the Blender API. An API is just an instruction manual on how a program needs things formatted for scripting. Blender’s API is a tad intimidating, but don’t let all that text fool you. Most of the text is describing parameters, which you can use to tell Blender things like what kind of light, how big of a light, and where it should be located.

I’ve decided that I’m going be adding a bunch of POINT lights, so that takes care of that. The only other thing I’m going to change here is the location.
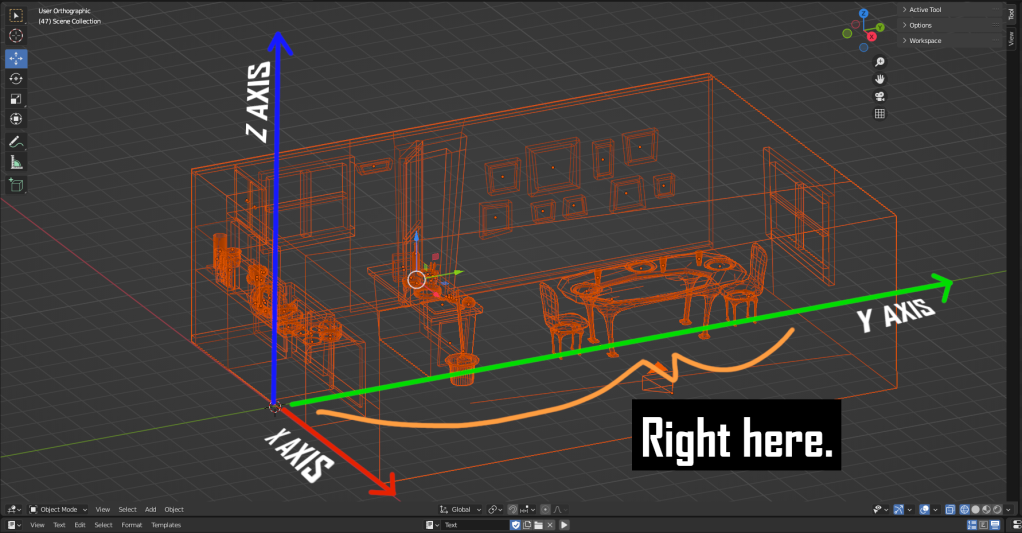
Location is going to be key because you’ll be varying this up depending on your specific scene. I want the lights all in a row. My kitchen is longest along the Y axis, so that’s where I’m putting ’em. Counting based on the grid, I want about 18 lights across my kitchen.
So I go into my Python Console, and I’m plugging my Light_Add command into a loop. Loops in Python are how you tell Blender to do something over and over again.
A very simple one might look something like this:
for index in range(18):
    bpy.ops.object.light_add(type='POINT', radius=0.05, location=(0.0, index, 0.0))
index is a variable that’s going to increase by one with each loop. When you pair it with range(number), it’ll go from 0 up to, but not including, the number. I want 18 lights total, so I’m plugging in 18, and running it.
Here’s what it looks like in slow motion.

The best part about this is that you can change up other things while you’re looping through the lights.
If you search the API for PointLight, you’ll see a page that lists out all the different attributes you can change up. The two I’m most interested are energy and color.
How do you change those up? We’re gonna go through a couple of options to see what Blender can do.
Option 1: Call it By Its Name
You can change attributes of your objects by referencing them by name in the Python console with this basic template.
bpy.data.objects['Name'].data.attribute = valueThat last loop we ran in the console autogenerated names—typically it’ll append numbers to the end as you add more of a specific kind of object, like Point.001, Point.0002 and so on.
So if you ran it and have a light called “Point”, try running these lines in the console. Keep your Point properties open so you can see it in action.
bpy.data.objects['Point'].data.energy = 10
bpy.data.objects['Point'].data.color = (1,1,1)
You may have noticed this option is less friendly to our loop above, so we’re going to talk about a really cool way of baking changes to attributes into the loop as the objects are being created.
Option 2: Call it as the Active Object
Immediately after Blender creates something, that thing is the active object of a scene. In the Python console, you can reference the active object by using a slightly different line.
bpy.context.active_object.data.attribute=valueThis is beautiful because we can incorporate it directly after our loop. Our color attribute takes three numbers—the red, green, and blue. These take a value between 0 and 1, so if you wanted a green light, you’d use (0,1,0). Like so:
for index in range(18):
    bpy.ops.object.light_add(type='POINT', radius=0.05, location=(0.0, index, 0.0))
    bpy.context.active_object.data.energy=1
    bpy.context.active_object.data.color=(0,1,0)
What’s that look like?

That’s getting a little closer to what I’m wanting. But still not quite. I want multicolored lights in my kitchen.
The last big thing to know about working with Blender is that you can import outside modules to help you get some more customized effects.
Slightly More Complicated Scripts
For this part, we’re going to leave the Python Console. It’s great for testing out quick scripts but a nightmare when dealing with anything running several lines. We need to be able to save the script. That’s where the Text Editor comes into play.
Once you get into the Text Editor, you can hit Text and New to start up a Python script. Then you can go Save As and name it with a .py extension. From here, you’ll hit that fun play button to actually run the scripts.

Since this is an official .py file, you’ll need take a couple of preliminary steps.
The first rule of using the Text Editor is that you’ll always need to import bpy, which is Blender’s module. A module is basically a set of all the things Python will need to know to interact with Blender. We’re going to import one other module called random. This contains instructions for Python on how to create random numbers.
You can read more about the random module in their documentation, but I’m only using a couple functions within it, including the most simple one:
random.random()That’ll give you a random number between 0 and 1, exactly what I need for my RGB values. So for instance, if I wanted to get random colors for my lights, I could use this.
import bpy
import random
for index in range(18):
    bpy.ops.object.light_add(type='POINT', radius=0.05, location=(0.0, index, 0.0))
    bpy.context.active_object.data.energy=5
    bpy.context.active_object.data.color=(random.random(),random.random(),random.random())
Getting ever closer to my desired effect.

My new issue is that I feel like the random generator is throwing me too many pastels. When all three values are close together, that’s how you get tones that look white or grey. I don’t want those. I’m looking for very clear, distinct colors—maybe red (1,0,0), blue (0,0,1) green (0,1,0), yellow(1,1,0), or purple (1,0,1).
Python has a way of stashing values for later use. You just give it a name and throw the desired data into brackets separated by commas. These are called lists.
list = [value1, value2, value3]And the Random module has a way of randomly selecting from a list. So if I plug in the desired numbers, I can still have a randomizer but with slightly more control.
import bpy
import random

colorlist = [(1,0,0), (0,1,0), (0,0,1),(1,0,1),(1,1,0)]

for index in range(18):

        bpy.ops.object.light_add(type='POINT', radius=0.05, location=(0.0, index, 0.0))
        bpy.context.active_object.data.energy=10
        bpy.context.active_object.data.color=random.choice(colorlist)
That’s pretty much what I’m looking for. I’m going to run the script twice to give myself another set of multicolored point lights at the top of my scene.
And my final result is below!

A Closing Note:
If this post looks familiar, it’s because I wrote a very similar one for an earlier version of Blender. This one was completed in Blender 3.0. Other similar reboots are in the pipeline, hopefully coming out this Spring!
